Layers View
The Layers View display in the Layer Manager offers you an alternative presentation of the layers contained in the project. It allows you to manage layer attribution, layer group creation, filtering, etc.
Access
- Click the
 icon in the Structure Tree panel.
 - Right click on the Assembly entry or an empty space in the Structure Tree panel to display the context menu. Select Switch to layers view.
The following panel is displayed:
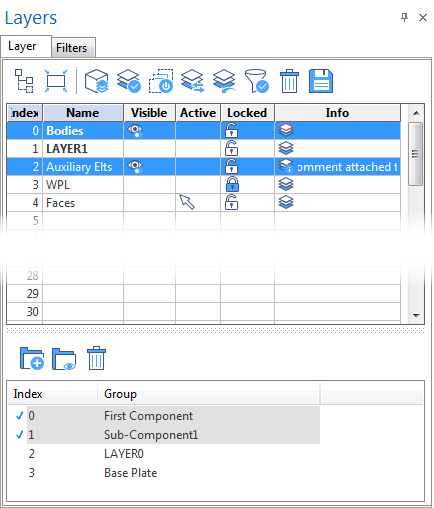
Next to the Layer tab, this panel contains a Filters tab allowing you to set additional filters for entity display in the graphic area. The interaction between the active layers and these filters defines which entities are actually displayed in the graphic area.
Layer Tab Description
In the Layer tab, the user has access to the following functions and information:
- The toolbar at the top of panel allows you to perform a certain number of actions on the layers.
- The layer table lists all of the existing layers. Compared to the Structure tree, layers are the nodes at the lowest level which actually contain the entities. You may perform some actions on layers (see below).
- The bottom section of this panel allows you to manage Layer Groups. Compared to the Structure tree, layer groups are the nodes that contain sub-nodes.
Layer Table Contents
|
Index |
This column displays the index of the layer which is assigned automatically. |
|
Name |
This column displays the name of the layer. Double-clicking on this field activates the edition mode allowing you to name or rename the layer. |
|
Visible |
This column indicates whether the layer is visible. In this case, the corresponding row is highlighted and the |
|
Active |
New entities are created in the active layer. This column indicates whether the layer is the active one. In this case, the |
|
Locked |
This column indicates whether the layer is locked (indicated by the |
|
Info |
The symbols in the Info column provide the following information:
|
 means that the layer contains entities.
 means that Visibility filters have been applied to some entities on this layer (refer to
  means that a comment is attached to this layer. To see this comment, you may extend the column width, hold the mouse cursor over this field to display an information box or double-click on this field to display the Edit Layer Comment dialog box allowing you to modify or enter the layer comment.
Table Sorting
- Successively clicking on the Index or Name column headers sorts the entries respectively in ascending/descending order.
- Clicking on the Visible or Locked column header displays all the visible or locked layers at the top of the list.
- Clicking on the Active column header displays the current layer at the top of the list.
Layer Table Context Menu
A Right Mouse click on the table header or in one of the rows displays a context menu containing the following entries:
|
Select elements on layer |
This option allows you to select the elements on the layer. They are highlighted in the graphic area, allowing you to perform actions on them. |
|
Add elements to layer |
This option allows you to add elements to a selected layer:
|
|
Lock |
Select this entry to lock the currently highlighted layers. |
|
Unlock |
Select this entry to unlock the currently highlighted layers. |
|
Rename |
Selecting this option activates the node name input field allowing you to rename the layer. |
|
Auto create layers |
Layers can only be selected if they have a name. You may use this option to automatically name a certain number of layers:
This will assign the defined name with the corresponding layer number to the specified layer range (Layername5, Layername6, ...). This function does not overwrite existing names. |
|
Import from file |
This option allows you to import the content of selected layers from another file.
|
|
Switch to structure tree view |
Select this option to switch the Layer Manager to structure tree display. |
|
Visible rows |
By default, the layer table contains 256 rows. If you want to change this number, select this option to display the Visible rows dialog box, enter a new number of rows to be displayed in the table and confirm by clicking the OK button. |
|
Number of elements |
If the context menu is called from an active (visible) layer, this section at the bottom of the context menu displays the number of entities contained in all of the visible layers. |
|
Layer status |
Selecting this option provides layer information in a text window. |
 Attention! The data from the imported layers will replace the data in existing layers.
![]() Note: Some of the options are not available if the context menu has been called from a column header.
Note: Some of the options are not available if the context menu has been called from a column header.
For further information...
- Layers - Toolbar Functions
- Layer Groups
- Filters Tab in the Layer Manager
- Layers Structure Tree
- Layer status